Alternative build - Arduino Mega + Arduino Motor Shield
The instructions on this page are the steps required to use an Arduino Motor Shield motor shield, or other supported motor driver, to build an EX-CommandStation.
These instructions assume a slightly more competent user who has made the decision to trade simplicity for price. It is assumed that you are comfortable modifying devices, maybe soldering etc. and are not going to make costly mistakes such as mixing up the power supplies or putting the processor board down on something that will short the underside of the pins.
There are a limited number of suitable motor or WiFi shields available and each has its own quirks.
Note. The use of the Arduino UNO is no longer supported.
What you need
To build a basic DIY EX-CommandStation you will need:
- A PC or laptop (Not A Raspberry Pi) running a reasonably recent versions of Windows, Linux or MacOS
- An Arduino Mega microcontroller running our free Open Source software
- USB cable to your PC for the processor.
- an Arduino Standard Motor-Shield (or others as noted in TODO) to power the track.
- A double-insulated DC power supply with a voltage suitable for your layout/locos.
- An additional double-insulated DC Power supply is needed to drive the Arduino microcontroller. 7 to 9 volts, using the barrel connector, is recommended when using a WiFi shield. 5 volts will not work for the barrel connector, but could be connected via USB cable.
- Optionally
- A female barrel connector to match the plug on your chosen track power supply
- A suitable WiFi shield to use WiFi throttles (recommended) with 2 suitable M-F Dupont wires.
OR - An Ethernet Shield
Step By Step Build
Prepare your Mega
- Use sticky tape or similar to cover the top of the USB connector on the mega. This prevents any accidental contact with the underside of the motor shield.
Optionally mount your Ethernet Shield
Note, you can't have Ethernet and WiFi running on the same EX-CommandStation, but you can install both shields and choose one or the other when installing the software. See Ethernet Install
Prepare your motor shield
FAILURE TO DO THIS CAN DESTROY YOUR MEGA.
-
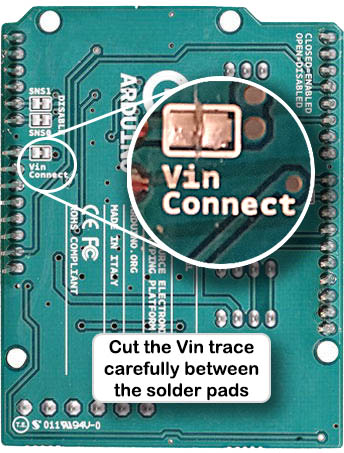
Unless you are using an EX-8874 motor shield (covered here), you MUST prevent the shield from feeding track voltage into your Mega. This is done by cutting the VIN trace and/or removing the pin that feeds the Mega.
-
Ensure shield pins are straight and correctly aligned.
Mount the motor shield
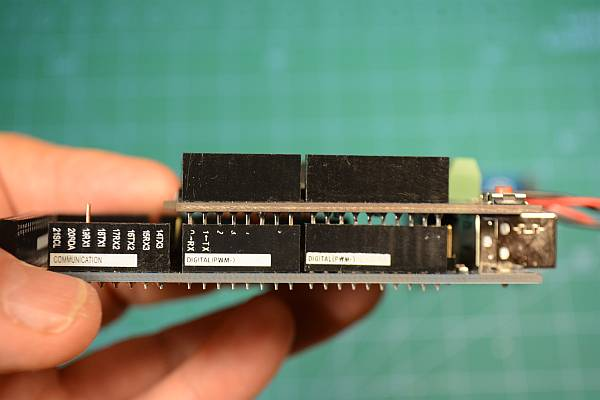
Align the motor shield so that the power connectors are at the same end as the Mega power/USB connectors. It is normal for you to see a few millimetres of the pins between the bottom of the motor board and the top of the headers.
Connect your track
 Don't skip this step if you don't yet have any track because the WiFi shield will cover the connectors.
It's best to create fly leads with a suitable pluggable connectors for later. It makes it much easier to detach your EX-CommandStation from your layout when you need to fiddle with it or throw it against the wall out of sheer frustration.
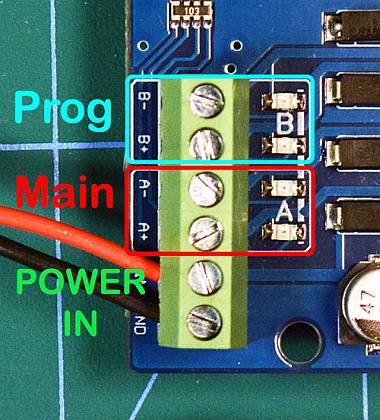
If you only have one piece of track for testing, wire it to the PROG track plug.
- The MAIN track is wired to the A channel output.
- Your PROG track is wired to the B channel output.
Connect your track power supply
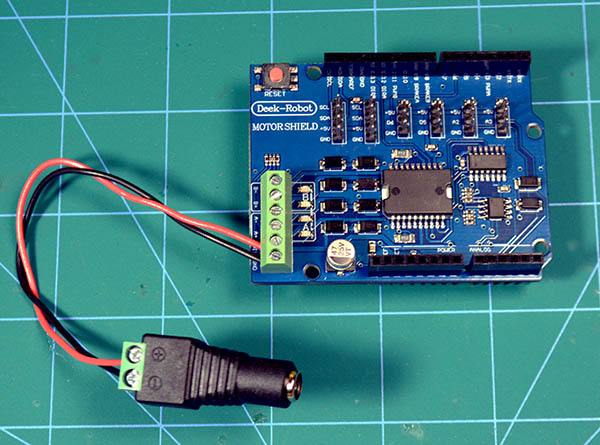 Wire your track power supply to the input turrets of the motor shield, observing polarity. It is best to create short wire with a female barrel connector.
Optionally install a WiFi Shield
See WiFi Install
Load the software
Software loading is best done with the EX-Installer