TrackManager
TrackManager is feature that lets you dynamically configure the outputs of your EX-CommandStation as either:
- Main DCC track output
- Programming DCC track output
- DC mode
- DCC Auto Reverse
- DCC Booster
Defaults
Track A defaults to MAIN. Track B defaults to PROG.
myAutomation.h
Track mode can be defined in myAutomation.h
Example: Set a track to DC
Engine Driver
This screen shows where track modes can be set with Engine Driver:
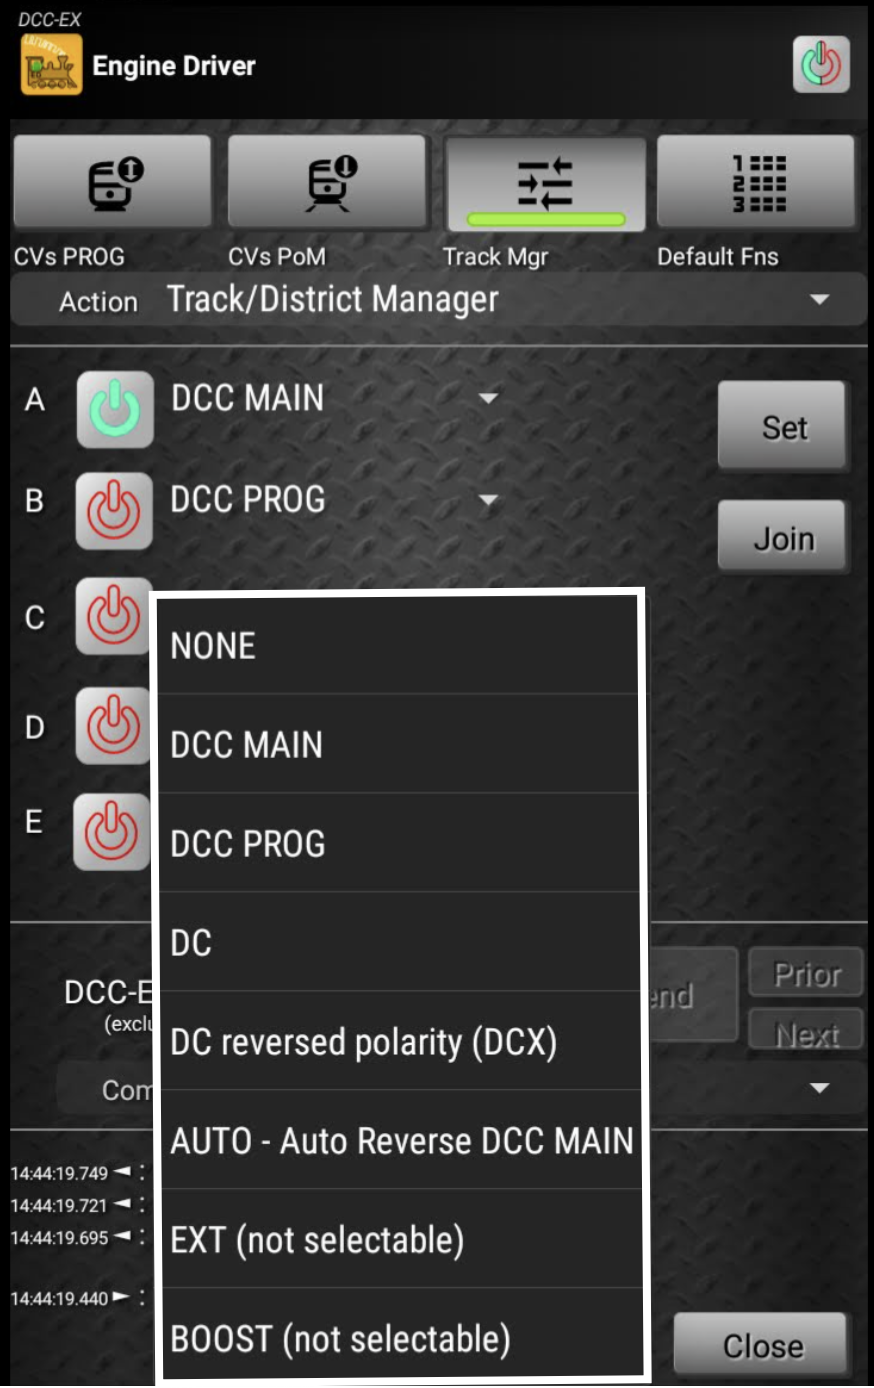
Notes
NOTE: DC output is only available with specific hardware requirements.
TrackManager - reference document
Multi-district DC mode track sync - additional detail
As these pages are under development, you may also want to refer to the legacy documentation
Track Manager Modes
By default the outputs of a Motor Driver are set to DCC. For Motor Drivers with two outputs one will be MAIN and one will be PROG. These, and any additional outputs, can be set to a number of different modes, not just DCC.
Valid Modes are:
| Option | _INV | _AUTO | Notes | |
|---|---|---|---|---|
MAIN |
✓ | ✓ | ✓ 2 | |
PROG |
✓ | |||
DC |
✓ | ✓ 2 | Motor drivers with brake pin only | |
BOOST |
✓ | ✓ | ✓ | ESP32 microcontrollers only |
EXT |
✓ | Reserved for future use | ||
NONE |
✓ |
1 - DC_INV / DCX is DC with an opposite polarity. Like NMRA modular layout track B which is wired left rail positive (+) and right rail negative (-)
2 - Replaces the deprecated alias of AUTO which required that it was preceded by a separate MAIN command.
3 - With special alias of DCX for DC_INV
Track power is automatically turned off
Whenever the track mode is changed, track power is automatically turned off. This is a safety precaution to prevent runaway locos.
Requirements (DCC and DC)
DCC Requirements
Nothing special or extra is required for any of the DCC modes.
DC Requirements
To run DC locos with your EX-CommandStation you will need:
- An EX-CommandStation.
- A motor shield with a brake pin.
(See the list of compatible boards at TODO :ref:reference/hardware/motor-boards:trackmanager dc compatible boards.)
(The EX-CSB1 and EX‑MotorShield8874 have a brake pin.) - A controller that can be used with the EX-CommandStation.
No additional external DCC decoders are required for DC (PWM) track assignments, and a single EX-CommandStation is the only hardware needed for full functionality.
Note: An additional suggested precaution is to add 4 fuses on wires (-b +b, -a +a) to the EX-CommandStation connections. Use 2A fuses for the standard motor driver or 5A fuses for the EX‑MotorShield8874 and other the larger motor drivers.
Additional Technical Information
If you are interested in the technical details of DC Pulse Width Modulation (PWM) visit our DCC vs DC page/reference/hardware/dcc-vs-dc page.
Changing a Motor Driver Output to a different DCC mode
track power is automatically turned off
Whenever the track mode is changed, track power is automatically turned off. This is a safety precaution to prevent runaway locos.
You can change any output of the Motor Driver either temporarily or permanently (every time the EX-CommandStation starts).
Temporarily Changing to a Different DCC Mode
There are several ways to temporarily change a Motor Driver Output to a different DCC Mode:
- By issuing a command to the the EX-CommandStation
- By using the TrackManager feature in Engine Driver or EX-Toolbox
- By creating EXRAIL Routes that can the activated in your throttle app.
Using Engine Driver or EX-Toolbox
Issuing a command (DCC)
You can issue DCC-EX Native/Serial Commands to the EX-CommandStation to change the output modes with Engine Driver, EX-Toolbox, Device Monitor, EX-WEbThrottle or the Arduino IDE Serial Monitor.
-
Open the Serial Monitor (or TrackManager page in Engine Driver or EX-Toolbox)
-
Issue the following command.
Note that in this example it is setting outputBto beDCC MAIN.
<= B MAIN>
Note: the track power is immediately turn off anytime you change the track mode.
Creating a Route (DCC)
Using a Route will set a specific loco number to be associated with DC output. This is a permanent relationship, in that it will be associated every time you start the EX-CommandStation.
We will be adding some instructions the myAutomation.h file a re-uploading the Command Station software your EX-CommandStation.
- Re-run the EX-Installer selecting the options you would normally choose, but of the last page before loading you also select
Advanced Config, before clicking theAdvanced Configbutton. - This will take you to the
Advanced Configurationpage, where you will have two (or possibly more) edit regions. One will be labelledmyAutomation.h. - in the
myAutomation.hedit region you will need to type or copy the something like the following.
Note that in this example I am setting output B to be DCC MAIN.
 ROUTE(3, "Set Output B to DCC MAIN") // 3 is the sequence identifier  it must be unique
   SET_TRACK(B,MAIN)  // Set Track B to DCC MAIN
   DONE
- Then Load the Command Station software as normal (on the next page)
Note the track power is immediately turn off anytime you change the track mode. you may wish to add SET_POWER( track, ON/OFF ) after the SET_TRACK() command. e.g. SET_POWER(B, ON).
Permanently Changing the DCC Mode
By default the outputs of a Motor Driver are set to DCC. For Motor Drivers with two outputs one will be MAIN and one will be PROG. These, and any additional outputs, can be set to a number of different modes, not just DCC.
You can set any Motor Driver output to be a specific DCC mode every time the EX-CommandStation starts up. (If you wish, at any time you can subsequently temporarily change it any other DC or DCC mode.)
This process is similar to a the 'Route' process in the previous section but will happen automatically at start-up rather than when you select the route.
We will be adding some instructions the myAutomation.h file a re-uploading the Command Station software your EX-CommandStation.
- Re-run the EX-Installer selecting the options you would normally choose, but of the last page before loading you also select
Advanced Config, before clicking theAdvanced Configbutton. - This will take you to the
Advanced Configurationpage, where you will have two (or possibly more) edit regions. One will be labelledmyAutomation.h. - in the
myAutomation.hedit region you will need to type or copy the something like the following.
Note that in this example I am setting output B to be DCC MAIN.
 AUTOSTART
   SET_TRACK(B,MAIN)  // Set Track B to DCC MAIN
   DONE
- Then Load the Command Station software as normal (on the next page)
Note the track power is immediately turn off anytime you change the track mode. you may wish to add SET_POWER( track, ON/OFF ) after the SET_TRACK() command. e.g. SET_POWER(B ON).
Auto Reverser (DCC)
Using MAIN_AUTO mode, the specified output will act as a DCC Auto Reverser. i.e. The phase of the DCC signal on the track will be automatically reversed when a short circuit or overload is detected.
To permanently set an output to be an Auto Reverser every time the EX-CommandStation starts up, follow the same instructions as for creating a Route above, but use MAIN_AUTO instead of MAIN or PROG. For example:
SET_TRACK(B,MAIN_AUTO) // Set Track B to DCC MAIN_AUTO
Changing a Motor Driver Output to DC
Track power is automatically turned off
Whenever the track mode is changed, track power is automatically turned off.
You can change any output of the Motor Driver either temporarily or permanently (every time the EX-CommandStation starts).
Controlling the output not the loco
It is important to note a key difference between controlling a DCC loco on a DCC output/track, and controlling a DC loco on a DC output/track.
In the case on DCC, you select the individual DCC address of the loco and you control just that loco regardless of how many other DCC locos are on the track.
!!! important inline end "avoid using existing loco DCC addresses
If you plan to also use DCC, when specifying a DC address, avoid using one of your existing loco DCC addresses.

Otherwise a command sent to control a DC output/track will also operate your DCC loco with the same address.
In the case of DC it is very different. You control the whole output/track and all the locos on it simultaneously. To do so we must assign that output/track an address. It is not a real DCC Address, but from the perspective of your controller, it will think it is a DCC Address.
When you read further just remember that the address assigned DC output/track is not really the loco. It is an address for the output/track.
Temporarily Changing to DC
There are several ways to temporarily change a Motor Driver Output to DC:
- By issuing a command to the the EX-CommandStation
- By using the TrackManager feature in Engine Driver or EX-Toolbox
- By creating EXRAIL Routes or Automations that can the activated in your throttle app.
Using Engine Driver or EX-Toolbox (DC)
Engine Driver has specific TrackManager features that allow you to alter the output modes. See the TrackManager control page on the Engine Driver web site for details.
EX-Toolbox has specific TrackManager features that allow you to alter the output modes. See the EX-Toolbox TrackManage page for details.
Issuing a Command (DC)
You can issue DCC-EX Native/Serial Commands to the EX-CommandStation to change the output modes with Engine Driver, EX-Installer, EX-Toolbox, EX-WebThrottle or the IDE Serial Monitor.
-
Open the Serial Monitor (or TrackManager page in Engine Driver or EX-Toolbox)
-
Issue the following command
note that in this example I am setting output B to be DC and to be assigned to the Loco Address 1225.
<= B DC 1225> // Set track B to DC mode with address 1225
Note the track power is immediately turn off anytime you change the track mode.
Creating a Route (DC)
Using a Route will set a specific loco number to be associated with DC output. This is a permanent relationship, in that it will be associated every time you start the EX-CommandStation.
We will be adding some instructions the myAutomation.h file a re-uploading the Command Station software your EX-CommandStation.
- Firstly you will need to select an address (1-10239) which will be assigned to the DC output. If you are also using using DCC on another output, pick a number that will not conflict with any of your own loco's addresses.
- Next re-run the EX-Installer selecting the options you would normally choose, but of the last page before loading you also select
Advanced Config, before clicking theAdvanced Configbutton. - This will take you to the
Advanced Configurationpage, where you will have two (or possibly more) edit regions. One will be labelledmyAutomation.h. - in the
myAutomation.hedit region you will need to type or copy the something like the following
note that in this example I am setting output B to be DC and to be assigned to the Loco Address 1225.
 ROUTE(1, "Set Output B to DC 1225") // 1 is the sequence identifier  it must be unique
   SETLOCO(1225)    // Assign Loco 1225
   SET_TRACK(B,DC)  // Set Track B to DC with address 1225
   DONE
- Then Load the Command Station software as normal (on the next page)
Note that this will make the output DC if you activate the route in you controller. See the DC Operation page for more information.
Note the track power is immediately turn off anytime you change the track mode. you may wish to add SET_POWER( track, ON/OFF ) after the SET_TRACK() command. e.g. SET_POWER(B ON).
Creating an Automation (DC)
Using an Automation rather than a Route creates a temporary association between a loco address and the DC output. It takes whatever address you currently have selected in the controller and assigns that to the output.
We will be adding some instructions the myAutomation.h file a re-uploading the Command Station software your EX-CommandStation.
- Firstly you will need to select an address (1-10239) which will be assigned to the DC output. If you are also using using DCC on another output, pick a number that will not conflict with any of your own loco's addresses.
- Next re-run the EX-Installer selecting the options you would normally choose, but of the last page before loading you also select
Advanced Config, before clicking theAdvanced Configbutton. - This will take you to the
Advanced Configurationpage, where you will have two (or possibly more) edit regions. One will be labelledmyAutomation.h. - in the
myAutomation.hedit region you will need to type or copy the something like the following
note that in this example I am setting output B to be DC and to be assigned to the Loco Address 1225.
 AUTOMATION(2, "Set Output B to DC") // 2 is the sequence identifier  it must be unique
   SET_TRACK(B,DC)  // Set Track B to DC
   DONE
- Then Load the Command Station software as normal (on the next page)
Note that this will make the output DC if you activate the route in you controller. See DC Operation page for more information.
Note the track power is immediately turn off anytime you change the track mode. you may wish to add SET_POWER( track, ON/OFF ) after the SET_TRACK() command. e.g. SET_POWER(B ON).
Permanently Changing To DC
By default the outputs of a Motor Driver are set to DCC. For Motor Drivers with two outputs one will be MAIN and one will be PROG. These, and any additional outputs, can be set to a number of different modes, not just DCC.
You can set any Motor Driver output to be DC every time the EX-CommandStation starts up. (If you wish, at any time you can subsequently temporarily change it any other DC or DCC mode.)
This process is similar to a the 'Route' process in the previous section but will happen automatically at start-up rather than when you select the route.
We will be adding some instructions the myAutomation.h file a re-uploading the Command Station software your EX-CommandStation.
- Firstly you will need to select an address (1-10239) which will be assigned to the DC output. If you are also using using DCC on another output, pick a number that will not conflict with any of your own loco's addresses.
- Next re-run the EX-Installer selecting the options you would normally choose, but of the last page before loading you also select
Advanced Config, before clicking theAdvanced Configbutton. - This will take you to the
Advanced Configurationpage, where you will have two (or possibly more) edit regions. One will be labelledmyAutomation.h. - in the
myAutomation.hedit region you will need to type or copy the something like the following
note that in this example I am setting output to be DC an to be assigned to the Loco Address 1225.
 AUTOSTART
   SETLOCO(1225)    // Assign Loco 1225
   SET_TRACK(B,DC)  // Set Track B to DC with address 1225
   DONE
- Then Load the Command Station software as normal (on the next page)
Note the track power is immediately turn off anytime you change the track mode. you may wish to add SET_POWER( track, ON/OFF ) after the SET_TRACK() command. e.g. SET_POWER(B ON).
Selecting A DC loco to control
Remember that the address you assigned DC output/track above is not really the loco. It is an address for the output/track.
While the process to control a loco is exactly the same as a DCC loco, the process to select it will vary depending on how you configured the Motor Driver Output to be DC.
If you set the Output to be permanently DC
- You will need to select the Loco Address you assigned to the output when you setup the permanent assignment.
If you used a Route (DC)
- Go to the list of Routes in your throttle app
- Activate the Route that you created
- You will then need to select the Loco Address you assigned to the output when you created the route.
If you used an Automation (DC)
- You will then need to select any Loco Address that you wish to use
- Go to the list of Routes and Automations in your throttle app
- Activate the Automation that you created
If you used Engine Driver, EX-Toolbox or a Command (DC)
- You will need to select the Loco Address you assigned to the output to DC.
Controlling a DC Loco
Any throttle that connect to an EX-CommandStation can control analogue (DC) locos just as easily as DCC locos. Throttle Compatibility:
- WiFi Throttles (e.g. Engine Driver, WiThrottle and many others)
- The DCC-EX browser based EX-WEbThrottle
- Other wired throttles to operate your DCC layout and your DC layout, either separately or a simultaneous combination of the two modes
Never drive a loco from/to DC and DCC
Never drive a loco, DC or DCC, from an EX-CommandStation controlled track or district to any other DCC or DC System.
Changing the Pulse Width Frequency
Frequency of PWM in DC Operation - PWM can use a variety of frequencies for the pulses it sends, and this can alter motor behaviour and noise etc.
The default frequency used for the EX-CSB1 is 131H, but this can be varied on-the-fly using the virtual DCC functions 29-31 to allow you to alter the frequency to better suit your loco's motor. This can of course be done during running from the throttle.
Just acquire the loco number you have assigned to your DC Output. Then select one of Functions 29, 30 or 31:
- No Function selected: Default - low frequency 131Hz
- F29: Mid frequency - 490Hz
- F30: High frequency - 3400Hz
- F31: Supersonic - 62500Hz
Trial and error will be needed for specific locos that do not respond well to the defaults (low) frequency setting.
Notes:
-
These functions are not cumulative - setting F30 overrides F29 and setting F31 overrides F29 & F30.
-
You need to activate the functions above once you have acquired the loco address that have assigned to the output.
Specifically:
1) Set the output/track to DC mode with a specified loco address 2) Acquire that loco address in your throttle app 3) Make sure the loco is stopped 4) Set the frequency by activating one of the functions above
- You need to stop the loco (throttle to zero) before changing the frequency using the function buttons.