![]()
Documentation - Getting Started


This page aims to provide the information required to help people contribute to our documentation.
If what is outlined in this page is too involved, and you simply wish to provide some content that we can add, clarify, or update, then simply get in touch with us via the Troubleshooting & Getting Help page and we can help you out.
Required Software
Refer to the Recommended Software page, in particular the section related to Python 3.x, GitHub Desktop and VSCode for the software necessary to contribute to the documentation.
GitHub Pages, Sphinx, and reStructuredText
Our website is hosted courtesy of GitHub Pages, is written in reStructuredText, with the HTML being generated by Sphinx.
reStructuredText is a markdown type language for typesetting documents from websites to PDF or LaTeX documents. Our Website is built upon this technology, so you should make yourself familiar with this by looking through the links provided.
There’s a handy reStructuredText QuickReference Guide here.
If you haven’t done so already, make sure you are familiar with how we use GitHub and are familiar with our Recommended Software.
GitHub repository and the sphinx branch
In order for GitHub pages to function correctly and automatically publish updated content, the content must be located in a specific repository named after the GitHub organisation, and therefore our website repository is dcc-ex.github.io.
In addition to this, rather than using the main or master branch, the default branch is called “sphinx”, so any branches created for contributing to documentation must use this as the parent, and all pull requests must be submitted against this same branch.
Procedure
Procedure overview
Ideally the documentation cycle would look like this..

Changes to the original would be pulled down from the original repository directly to your local (PC) repository. You would push your changes to your GitHub website repository. Then create a Pull request to send them to the original for review.
While this is possible, both GitHub Desktop and VSCode make it extremely cumbersome to do so.
So instead a slightly longer approach is described below…
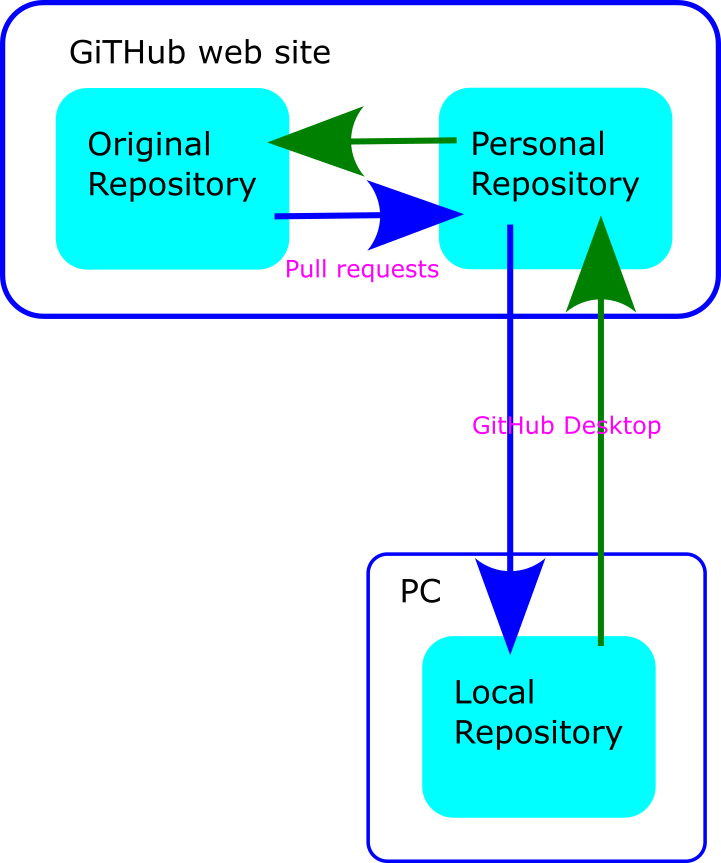
Changes to the original would be pulled down from the original repository to your GitHub website repository with a Pull Request. You will then pull those changes to you local (PC) repository. You will push your changes to your GitHub website repository. Then create a Pull Request to send them to the original for review.
There are a number of possible ways to do this but the instructions below are reasonably simple and work:
After installing the required software (particularly GitHub Desktop and VSCode) …
One time only:
Cloning the repository on the GitHub website
Using GitHub Desktop to download the repository to your PC
Ongoing:
Opening the repository in VSCode
Making your changes
Previewing your changes on your PC
Using GitHub Desktop to push your changes back to your clone of the Repository on GitHub
Creating a pull request to send your changes for review
You will periodically need to update your repository:
Create a pull request on the GitHub website to get any changes from the original repository to your repository on GitHub website
Use GitHub Desktop to pull the changes to your repository on your PC
One time only
1. Cloning the repository on GitHub website
First you will need to create an account on Github if you don’t already have one.
Go to the original repository
https://github.com/DCC-EX/dcc-ex.github.ioClick on the Fork button and create a new fork. (Do not alter the Repository name
dcc-ex.github.io.)
You will now have a new fork located at https://github.com/<your_account_name>/dcc-ex.github.io. Take note of this for the next step.
2. Download the repository to your PC with GitHib Desktop
In GitHub Desktop:
Select
Enter the name of you repository
<your_account_name>/dcc-ex.github.ioSelect a location on your PC to store the repository.
Click Clone
Make sure that
Sphinxis selected as the ‘Current Branch’
A copy of the repository should now be on the PC.
You can open it in VSCode by selecting Repository -> Open in Visual Studio Code
Ongoing
3. Open the repository in VSCode
You can open the repository in VSCode at any time by using and navigating to the folder you selected in step 2.
You can subsequently open the repository in VSCode using and selecting the repository name.
You can subsequently open the repository in VSCode from GitHub Desktop.
4. Make your changes
You can use the navigation tree on the left to find the file you want to change. Clicking on a file will open it in the edit window.
5. Live previews
Providing you followed the installation guide for VSCode on the Recommended Software page accurately, there are three methods available for generating previews as you are editing the reStructuredText code.
Esbonio Language server
This option uses the Esbonio Language server installed along with the reStructuredText extension. This option allows you to quickly preview a page you have been editing, as it continuously generates the preview in the background.
To view the preview you can
click on the preview button on the top right, or
Press <Ctrl>` + <Shift> + r and it will open the live preview in a new tab in VSCode. In addition to this method, you can also press <Ctrl>` + k followed immediately by <Ctrl>` + r.
This will generate the live preview in a split pane within VSCode. Every time you save the page you are working on, the live preview will automatically update.
The downside to using this method is that previews are only generated for pages you are actively editing, rather than the entire website. Therefore, prior to submitting any pull requests, it is essential that you follow the build process either as outlined below to emulate the GitHub Pages deployment, or in following section.
This will ensure the entire website is still able to be built successfully after any updates.
Emulate GitHub Pages deployment
The recommended method for local previews of the website documentation is to emulate the GitHub Pages deployment process, as this will not only generate a preview of the content, but will also ensure the same versions of the various Python packages are used to generate the preview, which will highlight any functionality issues arising out of new or different versions.
Right now this can only be done on Windows until a suitable bash script is created for Linux.
Open a command prompt.
Change to the directory where the “dcc-ex.github.io” repository has been cloned.
Run the command “local_deploy.bat”.
You will need to scroll up to review the output and ensure no errors are reported.
The list of installed package versions is also output which is of help if issues are observed when previewing.
If any errors have been generated, these must be resolved prior to submitting a pull request.
Once the build of the website completes successfully, preview it locally by opening the main “index.html” file locally in a web browser.
This file can be found in the “docs\_build\html” folder within the “dcc-ex.github.io” folder.
Local Sphinx build
To refresh the entire website while editing, it is necessary to run the equivalent commands that the GitHub publishing workflow runs to ensure no issues have been introduced.
To build the website using Sphinx, follow these steps:
Open a command prompt.
Change to the directory where the “dcc-ex.github.io” repository has been cloned.
Run the command “make clean”, review the output and ensure no errors are reported.
Run the command “make github”, and likewise review the output for errors.
If any errors have been generated, these must be resolved prior to submitting a pull request.
Once the build of the website completes successfully, preview it locally by opening the main “index.html” file locally in a web browser.
This file can be found in the “docs\_build\html” folder within the “dcc-ex.github.io” folder.
6. Push your changes to your GitHub repository
You will need to
Commit your changes
Push your changes
In GitHub Desktop:
Open/select the repository
note and review the changes that have been made
Add a
Summaryof your changesAdd a
Descriptionof your changes, if the summary is not sufficientclick Commit to Sphinx
click Push origin
7. Creating a pull request to send your changes for review
Open the GitHub website
Open/select your repository
https://github.com/<your_account_name>/dcc-ex.github.io
On the ‘code’ page you should see “This branch is x commit(s) ahead of DCC-EX/dcc-ex.github.io:sphinx.”
3. Click on the x commit(s) ahead of hyperlink 5. Confirm or add to the title and documentation fields 6. Click on the Create pull request button
This creates a pull request to be reviewed by the documentation team
Periodic
To see the changes that other people have made to the original repository you need to periodically refresh your repository on both GitHub website and locally
a. Get any changes to your repository on GitHub website
Open the GitHub website
open/select your repository
https://github.com/<your_account_name>/dcc-ex.github.io
On the ‘code’ page you should see “This branch is x commit(s) behind DCC-EX/dcc-ex.github.io:sphinx.”
If does not say you are ‘behind’ there is nothing to do. Stop here.
If you are behind…
3. Click on the x commit(s) behind hyperlink
5. Add to the title and/or documentation fields. This does not matter so entering just Catchup is fine.
6. Click on the Create pull request button
7. Click on the Merge pull request button
7. Click on the Confirm merge button
Any changes are now also in your repository on the GitHub website.
b. Pull the changes to your repository on your PC
In GitHub Desktop:
Click on the Fetch origin button`
Any changes are now also in your repository on PC.
Additional
Your own github pages
You can, optionally, setup github pages from you own repository on the GitHub website. This allows you to make changes that other people can view before creating a pull request.
Fork the “dcc-ex.github.io” repository, ensure the
Copy the sphinx branch onlybox is selected.In your forked repository settings, navigate to Settings -> Actions -> General and ensure
Allow all actions and reusable workflowsis selected.Set up VSCode for your forked repository as outlined above.
Create a new, orphaned branch called
gh-pagesusing the command line; you cannot do this in VSCode or in your browser. Open a command prompt (or bash shell) and change into the directory containing your cloned fork then run the following commands:
git checkout --orphan gh-pages
# Use Windows Explorer, macOS Finder, or whatever method you prefer and delete all files and folders within the directory.
# It must be completely empty aside from the hidden .git folder before proceeding.
echo "My DCC-EX Documentation Fork" > index.html
git add .
git commit -a -m "First commit"
git push origin gh-pages
At this point, review “Actions” in your forked repository and you should see the
pages build and deploymentjob run, allowing you to preview the temporary “index.html” once complete.Review the Settings -> Pages tab and click the
Visit sitebutton to open your GitHub Pages generated content in a new browser tab, and you should see the basic “My DCC-EX Documentation Fork”.If at this point in time the only action in the “Actions” tab is “pages-build-deployment”, click the “…” beside the latest run and select
Delete workflow run.You should now see a big green button
I understand my workflows, go ahead and enable them. Click this button, which will show all the available actions as forked from the DCC-EX repository.Now, each time you commit and push to your fork’s sphinx branch or merge a pull request to it, it should automatically build a new pages deployment and publish it.
Building the pages and deplying takes time, every time you push any changes, but you will eventually be able to see your own version of the website at https://<your_account_name>.github.io/dcc-ex.github.io/.
You can see the state of the processing of your changes by looking at the Actions page. It will also tell you there if there are any errors.