Controlling signals
Light and semaphore or servo signals
Light and semaphore or servo signals are always controlled by the first Vpin/pin associated with the signal.
For light signals, this means the Vpin/pin associated with the red aspect, and for semaphore or servo signals, there is only one Vpin associated with the signal, and so this vpin is used.
Interactive control with DCC-EX commands
Once your light or servo signals have been defined in myAutomation.h, you can use the DCC-EX native command </ RED|AMBER|GREEN vpin> to control them interactively via the EX‑CommandStation serial console.
You simple run one of these commands, providing the defined red vpin as the single parameter:
</ RED vpin>- Set the signal to the red aspect</ AMBER vpin>- Set the signal to the amber aspect</ GREEN vpin>- Set the signal to the green aspect
Automated control with EXRAIL commands
There are three EXRAIL commands available for controlling signals:
RED(vpin)- Set the signal to the red aspectAMBER(vpin)- Set the signal to the amber aspectGREEN(vpin)- Set the signal to the green aspect
It doesn’t matter what type of signal it has been defined as, the control commands are the same.
These commands can be used within automation sequences to automatically set signal aspects as part of other activities such as closing/throwing turnouts/points.
For a simple example, to set a signal at pin 28 red when turnout ID 201 is thrown, and green when it is closed, these turnout/point event handlers would be added to “myAutomation.h”:
SIGNAL(28, 30, 32)

ONTHROW(201)
  RED(28)
DONE

ONCLOSE(201)
  GREEN(28)
DONE
For further information on controlling signals refer to Signal Objects - Definition and Control, and for some examples refer to The Big Picture.
Signal event handlers
Further to this, if you wish to have other actions triggered by setting a signal aspect, there are three event handlers available for this:
ONRED(vpin)- Event handler when a signal is set to redONAMBER(vpin)- Event handler when a signal is set to amberONGREEN(vpin)- Event handler when a signal is set to green
For example, if you wish to set aspects on an advance signal according to a distant signal, this can be accomplished by using these event handlers:
ONGREEN(100)
  GREEN(101)
DONE

ONAMBER(100)
  AMBER(100)
DONE

ONRED(100)
  AMBER(101)
DONE
When the distant semaphore/servo signal at Vpin 100 is green, there is no need to warn approaching trains of this, so the advance semaphore/servo signal at Vpin 100 is also green.
When the distant signal 100 changes to amber, this will likely be followed by a red signal, so the advance signal 101 is also set to amber to warn approaching trains.
When the distant signal 100 changes to red, this also sets the advance signal 101 to amber to warn approaching trains.
For further information on controlling signals refer to Signal Objects - Definition and Control, and for some examples refer to The Big Picture.
Controlling DCC accessory signals
If using DCC accessory signals, these are controlled as per any other DCC accessory device, using the DCC accessory EXRAIL commands:
ACTIVATE(addr, sub_addr)- Activate (value 1) DCC accessory at the provided address and sub addressDEACTIVATE(addr, sub_addr)- Deactivate (value 0) DCC accessory at the provided address and sub addressACTIVATEL(addr)- Activate (value 1) DCC accessory at the provided linear addressDEACTIVATEL(addr)- Deactivate (value 0) DCC accessory at the provided linear address
As per defining and connecting DCC accessory signals, you will need to refer to the manufacturer’s information on how to control the specific signals you’re using.
For simplicity, we will assume here that DCC accessory address 101 sets the red aspect of a signal, 102 the amber aspect, and 103 the green aspect.
For a simple example, in order to have a red aspect set when turnout ID 201 is thrown, and green when it is closed, these turnout event handlers can be defined in “myAutomation.h”:
ONTHROW(201)
  ACTIVATEL(101)
DONE

ONCLOSE(201)
  ACTIVATEL(103)
DONE
For further information on controlling DCC accessories including signals refer to DCC Accessory Decoder Control.
DCC accessory event handlers
Further to this, if you wish to have other actions triggered by setting a DCC accessory signal aspect, there are four DCC accessory event handlers available for this:
ONACTIVATE(addr, sub_addr)- Trigger an activity when accessory at address and sub address is activatedONDEACTIVATE(addr, sub_addr)- Trigger an activity when accessory at address and sub address is deactivatedONACTIVATEL(addr)- Trigger an activity when accessory at linear address is activatedONDEACTIVATEL(addr)- Trigger an activity when accessory at linear address is deactivated
For example, if you wish to set aspects on an advance signal according to a distant signal, this can be accomplished by using these event handlers:
ONACTIVATEL(103)
  ACTIVATEL(107)
DONE

ONACTIVATEL(102)
  ACTIVATEL(106)
DONE

ONACTIVATEL(101)
  ACTIVATEL(106)
DONE
When the distant DCC accessory signal is set to green (address 103), there is no need to warn approaching trains of this, so the advance DCC accessory signal is also set to green (address 107).
When the distant signal changes to amber (address 102), this will likely be followed by a red signal, so the advance signal is set to amber (address 106).
When the distant signal changes to red (address 101), this also sets the advance signal to amber (address 106) to warn approaching trains.
For further information on controlling DCC accessories including signals refer to DCC Accessory Decoder Control.
Controlling signals with more than three aspects
Light signals
Controlling light signals with more than three aspects is relatively straight forward, and can be accomplished by defining an additional signal object for the extra aspects required.
The available event handlers for the various objects can be used to control these with some careful thought.
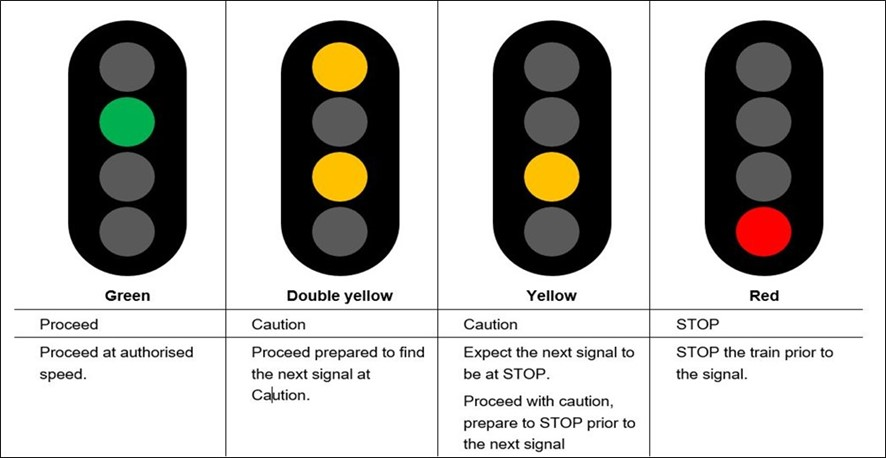
To use a simple example, we can define a four aspect signal based on an Australian variant where there are two amber lights, with second amber light above the green light.

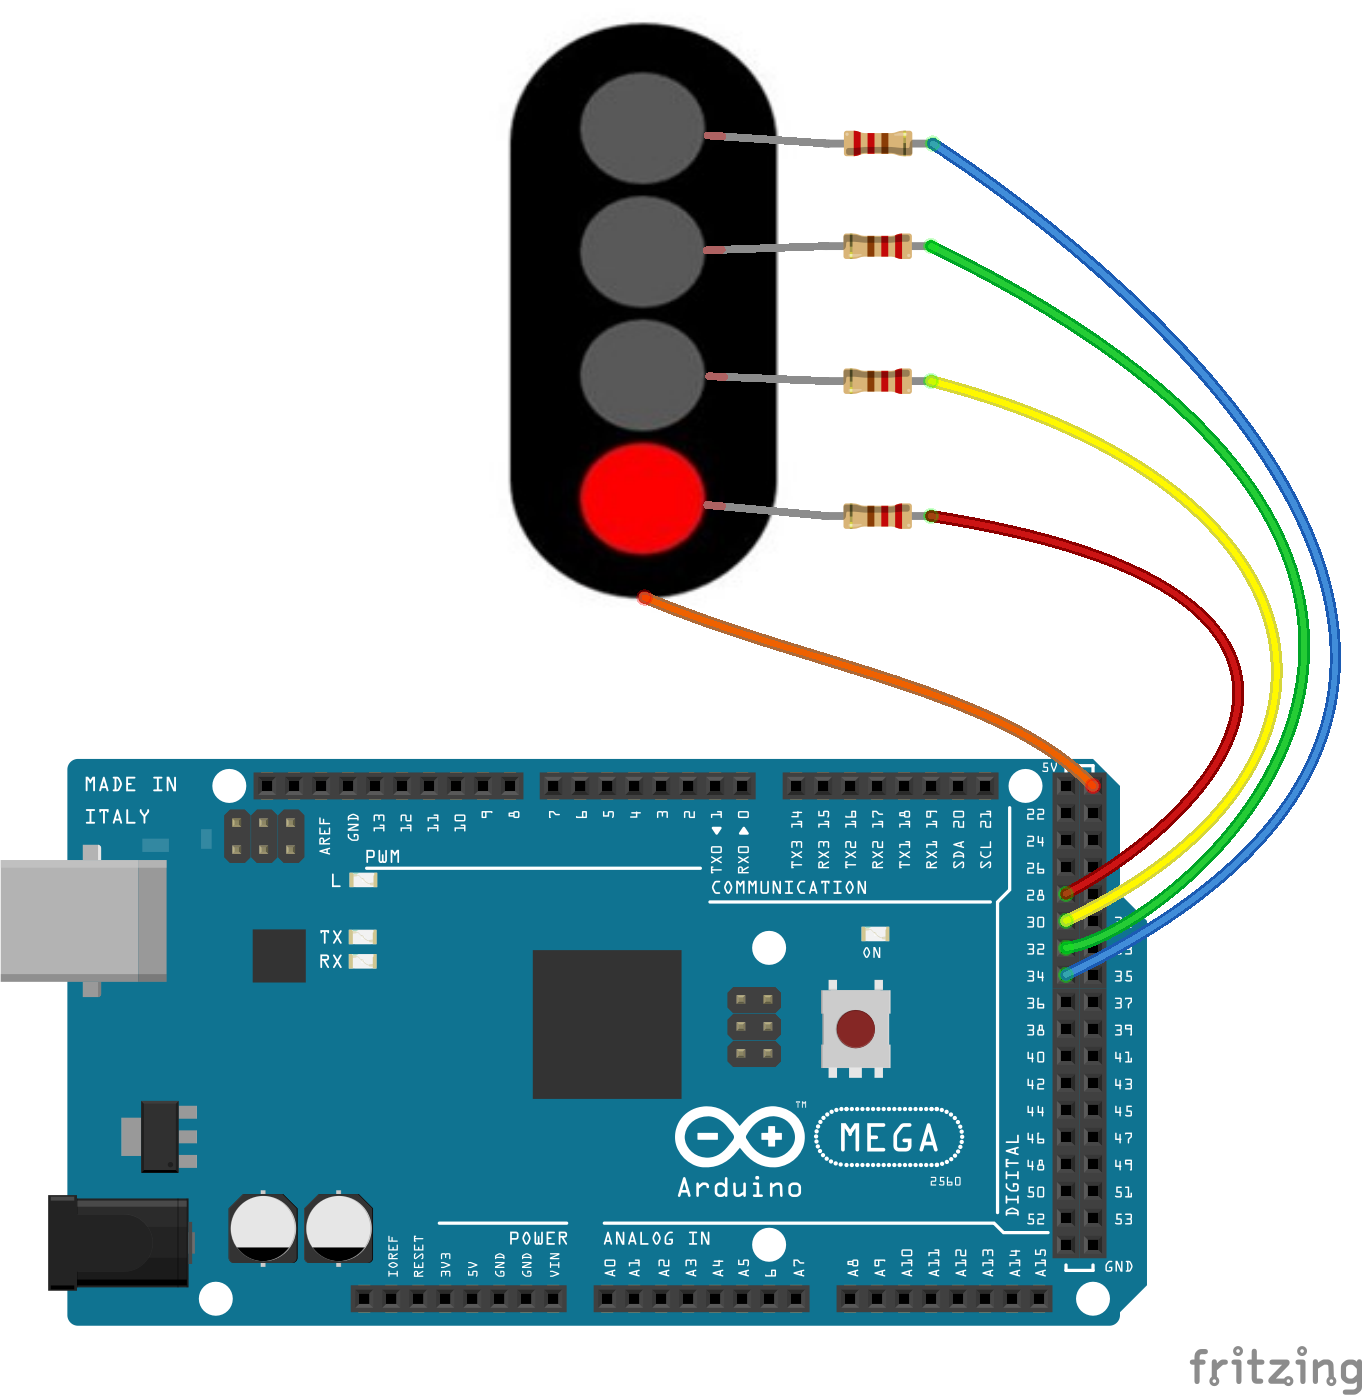
We would connect this signal as outlined below, with the red connected to pin 28, the first amber to 30, green to 32, and the second amber to 34.

In this instance, we would define the first three aspects as per any other signal, with a second signal object defined using the red aspect to operate the amber light, and a virtual pin used (5000) in order to be able to turn the amber aspect on and off.
Using our event handlers, to set the aspects of this four aspect signal based on a distant signal, this can be accomplished with EXRAIL by defining these in “myAutomation.h”:
SIGNAL(22, 24, 26)    // This is the distant signal which is a standard three aspect signal
SIGNAL(28, 30, 32)    // This is our first three aspects of the advance signal
SIGNAL(34, 0, 5000)   // This is our second signal for the fourth aspect of the advance signal

ONRED(22)     // When distant signal is red:
  AMBER(28)   // Set amber on
  GREEN(34)   // Set second amber off as green is virtual
DONE

ONAMBER(22)   // When distant signal is amber:
  AMBER(28)   // Set amber on
  RED(34)     // Set second amber on (connected to red pin)
DONE

ONGREEN(22)   // When distant signal is green:
  GREEN(28)   // Set green on
  GREEN(34)   // Set second amber off as green is virtual
DONE
When the distant signal is red, we set the advance signal to amber, with the second amber off.
When the distant signal is amber, the advance signal is set with both amber lights on.
When the distant signal is green, the advance signal is also green, with the second amber off.
This is a relatively simple example, and there are many complex signals in operation around the world, so you will need to evaluate which combination of signal objects and event handlers give you the most realistic configuration for your requirements.
Semaphore or servo signals
Semaphore signals with more than three aspects on the same semaphore arm aren’t possible by using the SERVO_SIGNAL(...) EXRAIL command, so some creative thinking will be required here.
It would be possible, for example, to use the event handlers and the generic SERVO(vpin, angle, profile) command to move a semaphore arm to any arbitrary position.
If the additional aspects beyond the first three are provided by a second semaphore arm, you will need an additional servo and associated object to accomplish this.
DCC accessory signals
For DCC accessory signals with more than three aspects, once again, you will need to refer to the manufacturer’s instructions on how to control these.
Using the extra aspects will be a simple matter of adapting the event handlers to use the extra addresses available.


