![]()
EX-WebThrottle


EX‑WebThrottle is a throttle (controller) that can connect to the EX‑CommandStation directly through the USB port of a computer.
For a video on how to install and use EX‑WebThrottle click below.
What you need to run EX-WebThrottle
Chromium-Based Browser version 89 or above (March 2021) (Chrome, Opera, Edge)
You don’t need anything else to test it out and to run in emulator mode, just run it and play. To use it to run real trains you will need:
DIY EX‑CommandStation based on a Arduino Mega, Arduino Uno, or other compatible microcontroller with a compatible Motor Shield
Plus the EX‑CommandStation software already loaded
Getting started
Note
If you don’t have your hardware yet or just want to play with the throttle and see commands being sent to the log window, you can skip the part about connecting your EX‑CommandStation.
Make sure you are using Chrome version 89 or above (check the menu, help, about screen) or a compatible web browser. (See above)
To get started, connect your EX‑CommandStation to a computer that has a USB port and which has a compatible browser installed. Use a USB serial cable from your computer to the USB connector on the EX‑CommandStation. Power everything up and put a loco on the MAIN track.
Run or Install EX-WebThrottle
You have an option for how you would like to run EX‑WebThrottle, from the cloud or installed locally on your machine. We recommend using it from the cloud but the choice is yours.
Run it now (Run from the cloud)
Just click the ‘Run Ex-WebThrottle Now’ button below and you will load a web page from our server that will run the web throttle on your computer. You can connect it to the EX‑CommandStation or just run it in emulator mode where you don’t have to have any hardware. Please read the requirements above for what you need in order to run EX‑CommandStation in your browser. If you want to remember the link to run the throttle, it is https://dcc-ex.github.io/WebThrottle-EX  .
.
EX‑WebThrottle is also a Progressive Web App (PWA). That means you can install it on your computer and run it right from your start menu! If you go into the EX‑WebThrottle settings panel (click the 3 line, or 3 dot, “hamburger menu” at the top left), you will find a “Settings” menu. Click on “Apps” and then select “Install as an App”. You can now work offline and always find EX‑WebThrottle with your other Apps!
Download
Note
We recommend using the version hosted on our servers as this will auto-update whenever we release a new update!
This will install all the files to run locally on your machine. You won’t need an internet connection to run the software. Just download the latest zip file from the link below and extract it to any folder you have run permission on. Then click on the index.html file to launch the throttle in your browser. Create a shortcut to it on your desktop so you can launch it more easily.
Operation
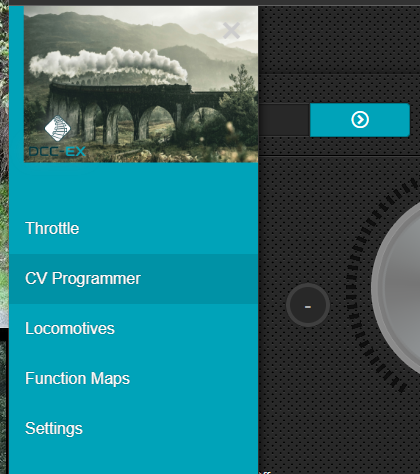
Fig 344: EX-WebThrottle - Menu
EX‑WebThrottle has five pages which you can switch between using the hamburger menu button (three horizontal bars) on the top left of the screen, or direct icon buttons at the top of the screen.
Throttle (the default page)
CV Programmer
Routes/Automation
Turnouts/Points
Locomotives (local)
Function Maps (local)
Settings
Throttle
Fig 345: EX-WebThrottle screen
To use the program to connect to your EX‑CommandStation leave the Serial dropdown as is.
(See the section below if you wish to use the “emulator mode”. )

Fig 346: EX-WebThrottle - Connect button
Next, click on the Connect EX-CS button.
When using the serial connection, if the program finds any compatible devices, it will open a popup a window showing you a selection. It may show a line at the top such as “Arduino Mega 2560 (COM3)”. Your com port may vary. Click on your board to select it and then click the Connect EX-CS button.
You should then be connected to the EX‑CommandStation and should see the response from the Command Station in the log textbox of the debug console at the bottom of the throttle window. Make sure your debug console is open. If it isn’t, use the Debug Console slider button in the lower lower right to open it.
When the command station is ready to use you should see [i] EX-CommandStation is READY appear in the log.
Now you are ready to run trains! Place your loco on the track and click the Power slider button to turn on power to your track (if not already on). You should see LEDs on your Motor Driver and an indication that your loco has power.
Note
Make sure you place the loco on the MAIN track, not the PROG track. Check your wiring. On an Motor Driver, Motor Output “A” should connect to your MAIN track and “B” to the PROGRAM track.
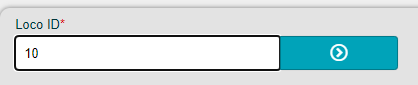
Fig 347: EX-WebThrottle - Loco ID
Next go to the Loco ID textbox and enter the DCC Address of your loco and press the Acquire (right arrow in a circle) button.
You should now have full control over your loco.
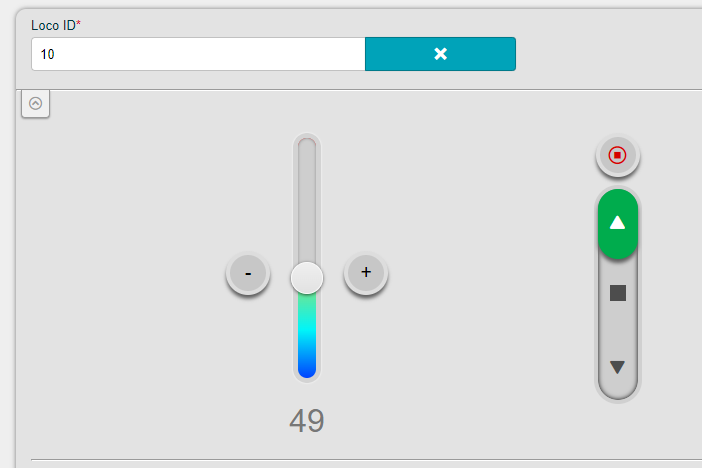
Fig 348: EX-WebThrottle - Speed and Direction
In the throttle control area, to the left of the function buttons, are vertical controls to control direction. The up arrow selects forward, the square button is stop and the down arrow is reverse.
All the function buttons should be working, so you can play with the headlight, horn and bell and any other function assigned to a function button. The commands being sent to the Command Station and its responses will display in the log window if it is open
The circular control or vertical slider (chosen by the throttle select slider) can be moved by clicking and holding down the mouse button and dragging, clicking at a spot where you want the throttle to move, or clicking the + and - buttons.
Issuing Direct Commands

Fig 349: EX-WebThrottle - Direct commands
Once you are connected, you can also send commands directly to the EX‑CommandStation.
e.g. You can send the <s> command in the “direct command” textbox to get status information from your Command Station. To do this just enter s (without the quotes) and press the Send button.
You should see <iDCC-EX...> returned in the log window with your version, type of Arduino, type of motor driver, and some other information.
You can send any DCC-EX Native command in this way.
Emulator
To use the program in to emulate an EX‑CommandStation, without actually connecting to a real one, click on the Serial dropdown button and select Emulator to run in emulator mode, then follow to instructions above from Connect.
Note
Not all Command Station functions are fully supported in the emulator yet. This means that although the software works, not all the responses will be shown in the debug console. This will be completed in a later release.
Routes/Automation
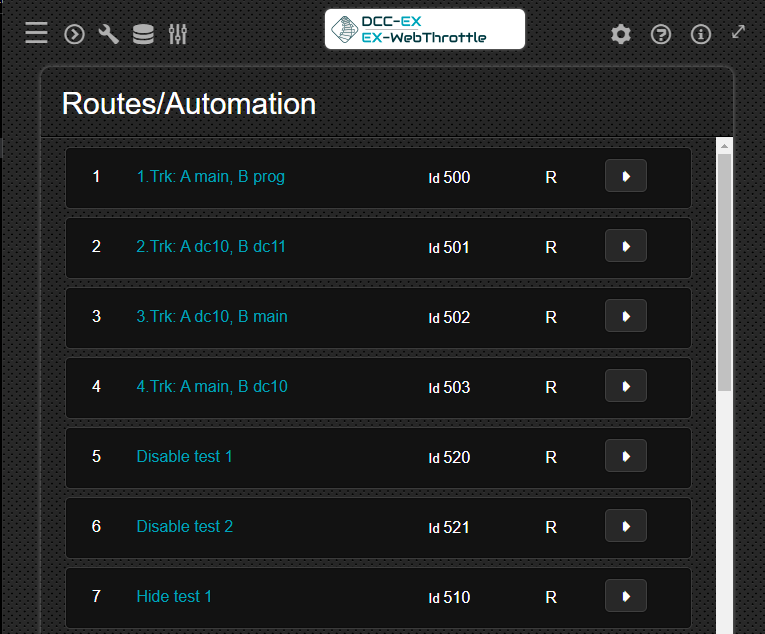
Once connected to a EX‑CommandStation, The Routes/Automation page allows you to activate any of the Routes or Automations that have been stored in your EX‑CommandStation, if any.
Clicking the Set button on a Route/Automation will activate it.
Turnouts/Points

Once connected to a EX‑CommandStation, The Turnouts/Points page allows you to throw or close any of the Turnouts/Points that have been stored in your EX‑CommandStation, if any.
Clicking either the Throw or Close buttons on a Turnout/Point will change it.
CV Programmer
The CV Programmer page allows you to read and write CVs (including the DCC address) from/to a decoder on the PROG Track.
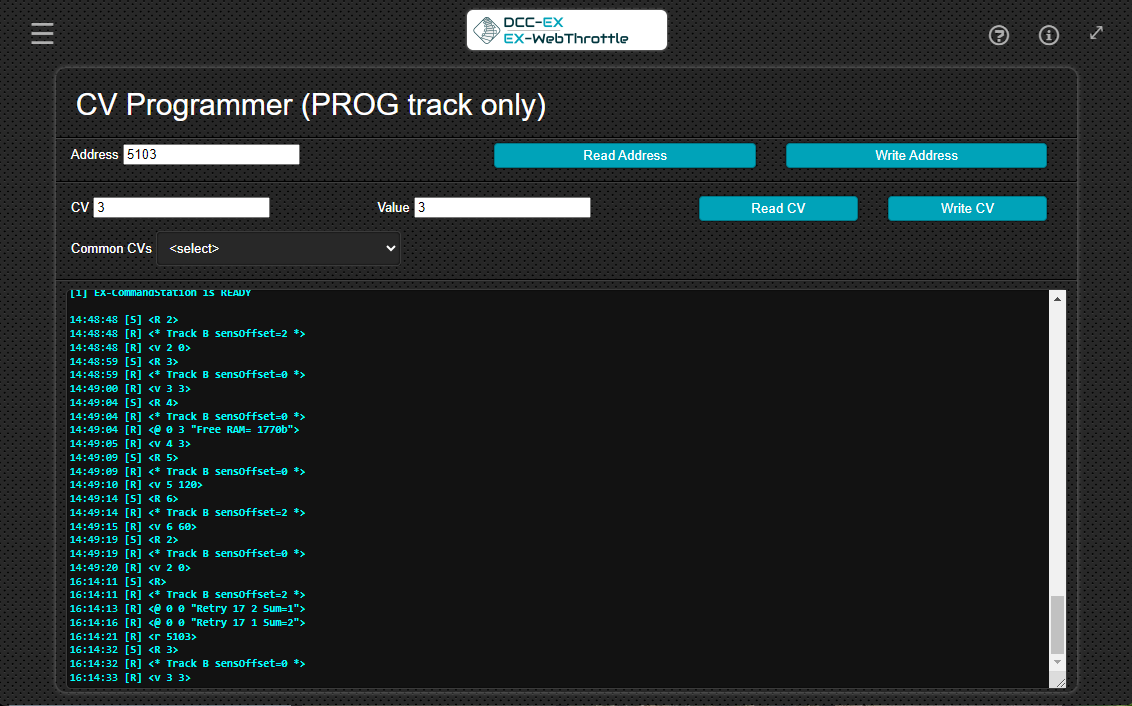
Fig 350: EX-WebThrottle - CV Programmer
Note you must first connect to the EX‑CommandStation from the Throttle page before you can use these features.
Decoder Address
To read a decoder address, place your loco on the PROG track and press Read Address. If Successful, the Address will be loaded in the DCC Address Field. If unsuccessful, a message to that effect will appear in the log.
To write a decoder address, place you loco on the PROG track, enter the desired address into the DCC Address field and press Write Address. If Successful or unsuccessful, a message to that effect will appear in the log.
CV
To read a CV, place your loco on the PROG track and press Read CV. If Successful, the Value of the CV will be loaded in the CV Value field. If unsuccessful, a message to that effect will appear in the log.
To write a decoder address, place you loco on the PROG track, enter the desired CV into the CV Numver field, the desired value into the CV Value field and press Write CV. If Successful or unsuccessful, a message to that effect will appear in the log.
You can use the Common CVs drop list to select a CV. The approprate value will be put into the CV Number` field on selection.
Note
Programming on the Main (PoM) is not currently supported directly, though you can manually issue the appropriate commands from the throttle page.
Locomotives
The Locomotives page allows you store a ‘roster’ of locomotives. This is stored in the individual PC/computer, and cannot be accessed by any other computer, unless exported and imported into that computer. The ‘roster’ cannot be accessed by any mobile device (phone app).
Use of this is not recommended as it may not be available in the new version of EX-Toolbox currently being developed.
Note
This is very different to the roster that can be stored in the EX‑CommandStation itself.
Function Maps
The Function Maps page allows you store collections of Function Maps. This is stored in the individual PC/computer, and cannot be accessed by any other computer, unless exported and imported into that computer. The ‘functions maps’ cannot be accessed by any mobile device (phone app).
Use of this is not recommended as it may not be available in the new version of EX-Toolbox currently being developed.
Note
This is very different to the functions stored with roster entries that can be stored in the EX‑CommandStation itself.
Settings
The Settings page allows you to manage aspects of the EX‑CommandStation apps.
General
Storage
App
General
Theme
Speed controller
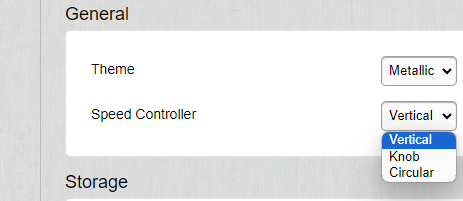
Fig 351: EX-WebThrottle - Settings - Speed Controller
Theme Allows you change the appearance of the EX‑WebThrottle screen to one of these options:
Simple
Metallic
Dark
Speed Controller allows you to select one of these options:
vertical
Knob
Circular
Storage
Use of this is not recommended as it may not be available in the new version currently being developed.`
Export App data
Import App data
Wipe App data
App
Install as an App
Going Further / Developing
If you want to really delve into how this works and help us improve it with your comments or your development skills, please contact us. You can also read through our Contributing to EX-WebThrottle2 page for info on preparing to view and contribute to the code.
To load the Chrome DevTools to look at logging and be able to manually enter “write” commands for testing, click on the Menu (the 3 vertical dots in the upper right hand corner of the Chrome Window), then select “more tools” and then “Developer Tools”. Or you can just hit Ctrl + Shift I
Looking for some help with EX-WebThrottle?
To find out how to request assistance click the first button below. To raise a bug report, feature request, support request, or submit Beta test results, feel free to use our handy GitHub templates accessible by clicking the second button: