![]()
Duinopeak ESP8266 WiFi Expansion Board


This board is designed as an expansion/prototyping board as well as a WiFi board. Tinkerers that want the extra space on the board to solder your experiments can have a party on the PCB! The only caveat with this board is that it cannot easily be connected in “passthrough mode” if you needed to use the Arduino to test a direct connection to the onboard ESP8266. It does not like the USB cable connected at the same time as a signal is on the Tx/Rx pins. This is a minor issue and does not affect normal operation since you won’t have anything connected to the USB port.
Note
This is just a carrier board for an ESP-01 or 01s. You will still need an ESP-01s to place onto this board. See the next section.
Warning
Please be aware that the Espressif firmware shipped with Duinopeak ESP8266 WiFi Expansion and ESP-01 or ESP-01S devices will probably NOT work with EX‑CommandStation out of the box.
(Note: The recommended Makerfabs ESP8266 WiFi Shield is now shipping with the correct firmware version and will work with EX‑CommandStation without modification).
This can be corrected, but is probably beyond Conductor level and requires additional hardware.
See ESP8266 (WiFi Boards) - AT Version Issues and Solutions for details on how to check the version and how to correct it if needed.
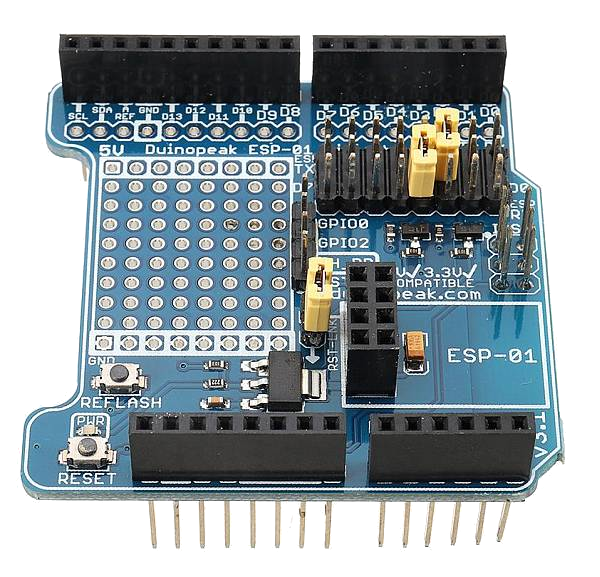
Fig 173: Duinopeak WiFi Board
Install the Shield
To install this board on your Arduino, follow the same steps as above, with the added step of installing an ESP-01s onto the board:
Remove or place the plastic pin jumpers to the side
Align and seat the board
Use wire jumpers to connect any Rx pin to Tx1 on the Mega, and any Tx pin to Rx1 on the Mega
Seat an ESP-01s onto the 8 pin header on the board, oriented with the white ESP-01 outline